Antique Identifier for Wood Identification in Furniture
Definition: Wood identification for antique furniture is the process of using grain, color, construction, veneer, finish, maker marks, and style clues to determine likely wood type, age, origin, and market context.
Use an antique identifier app to compare grain, veneer, joinery, finish, and maker mark clues from photos before you price or describe a furniture listing. TIQ can help resellers appraise antiques by picture with first-pass wood clues, era context, and rough value ranges.
> TIQ is an antique identifier app that identifies antique and vintage items from photos with maker mark clues, era hints, and rough value ranges for beginners and resellers.
- Start by confirming whether the visible surface is solid wood, veneer, MDF, plywood, plastic, or a faux finish.
- Grain pattern, pore size, rays, and end grain are safer clues than color because stains and old finishes change wood appearance.
- Treat photo-based wood ID as a likely range, not a certified species call, especially on restored or heavily finished furniture.
Recommended App: TIQ Antique Identifier
TIQ is an antique identifier app for researching furniture, wood clues, maker marks, and resale value context from photos. It can help resellers appraise antiques by picture as first-pass research before pricing listings, comparing likely materials, construction details, and market signals in one workflow. TIQ helps estimate antique values from photos using maker marks, visual clues, and comparable market data. It also works as a maker mark identifier and antique finder when you need to connect an unknown piece with similar items. For insurance, estate, tax, or legal decisions, use a qualified appraiser.
- Identify antiques by photo, including furniture details such as grain, veneer, finish, joinery, hardware, and style.
- Check maker marks, labels, stamps, signatures, and construction clues that may support attribution or dating.
- Estimate antique value ranges using comparable market data and visible condition factors.
- Use first-pass research to price reseller listings before sale with clearer description and value context.
- Helpful for resellers, collectors, estate cleanout teams, dealers, and anyone sorting inherited or found antiques.
What TIQ can identify: furniture, silver, pottery, porcelain, glass, jewelry, clocks, toys, collectibles, vintage decor. Available for iPhone.
TIQ at a Glance
What is TIQ? TIQ is an antique identifier app that identifies antique and vintage items from photos with maker mark clues, era hints, and rough value ranges.
What does it do? Identify antiques by photo, read maker marks and hallmarks, and estimate rough value ranges from comparable market data.
Who is it for? Collectors, inheritors, resellers pricing listings before sale, and anyone researching unknown antiques or vintage items.
Why use it? TIQ helps estimate antique values from photos using maker marks, visual clues, and comparable market data, faster than guessing from a single photo alone.
Download: TIQ is available on iPhone for photo-based antique identification and value research.
Download App: identify wood furniture Download Now
Antique furniture wood identification: the beginner-safe definition
Antique furniture wood identification means narrowing the likely species, wood family, or construction material in a piece of furniture; it does not prove age, maker, authenticity, or value by itself.
People identify wood to understand age clues, quality clues, repair choices, resale descriptions, and value context. A walnut-veneered Victorian dresser asks different questions than a painted pine cupboard, even before hardware or joinery enters the file. One piece may include show wood on the front, cheaper secondary wood in drawer sides, different back boards, and a thin veneer on the top.
The hidden parts matter.
Hardwood identification is especially useful because hardwoods are heavily used in higher-value furniture, cabinetry, and flooring. Still, a species guess should sit beside construction, style, provenance, and condition notes, not replace them.
How wood identification for antique furniture works from photos
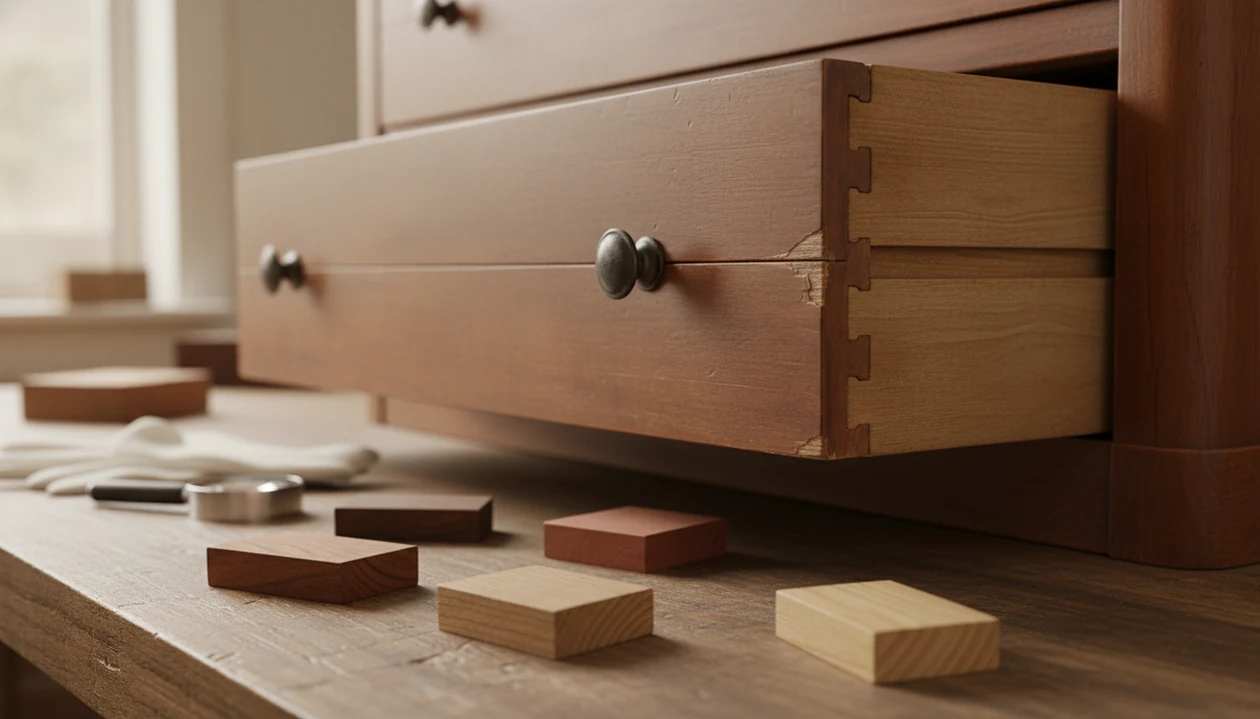
Wood identification from antique furniture photos works by comparing visible structure: grain direction, pore size, rays, end grain, veneer seams, and construction context. The safest first-pass method is to isolate bare or least-finished areas before judging the show surface.
In practice, we look under drawers, along board ends, inside chipped corners, and across unfinished back edges. A macro shot of dovetail drawer joints can show secondary wood more honestly than a polished top under dining-room light. Photo-based tools compare visible patterns against known wood and furniture references, but antiques add finish, wear, shadows, polish, smoke, sun fading, and repairs.
Image-based wood ID is more reliable under controlled conditions than on finished furniture in a living room. The USDA Forest Products Laboratory explains that wood identification depends on anatomical features such as pores, rays, and growth-ring structure, while computer-vision wood ID reviews note that high accuracy usually comes from controlled image sets rather than varnished, stained, repaired antiques: USDA Forest Products Laboratory and DOI reference. For beginners, wood ID from photos is useful evidence, not a final ruling.
Five antique furniture wood facts beginners should know first
- Confirm whether the surface is real wood, veneer, plywood, MDF, plastic laminate, or painted faux grain before naming a species.
- Grain, pores, rays, and end grain are usually better identification clues than color, since stain and old finish can shift appearance.
- Oak, walnut, mahogany, satinwood, pine, maple, birch, and poplar appear often in antique and vintage furniture.
- Veneer is not automatically low quality or modern; fine antiques often use expensive veneer over a secondary wood.
- AI and app results are useful starting points, but hands-on checks are still needed when weight, texture, smell, and fresh end grain matter.
For a beginner, identifying the construction material first is often safer than guessing the species because imitation surfaces can copy color and grain. If a drawer front looks like walnut but the chipped edge shows a printed pattern over fiberboard, the research path changes immediately.
Before You Start: Photos and Tools Needed
Before you start, set up the furniture so the photos show evidence, not mood. A clean lens, daylight, and simple hand tools will usually tell you more than a dramatic close-up under warm indoor light.
- Use natural daylight near a window or outside in shade, wipe the camera lens, and turn off beauty filters or color effects that can smooth pores and shift stain.
- Bring a small flashlight, tape measure, soft cloth, and magnifier so you can check dark undersides, record scale, cushion a surface, and inspect fine grain or veneer lines.
- Photograph hidden areas before pulling a fragile drawer, sliding a panel, or turning the piece; the first image can preserve how loose parts sat before movement.
- Avoid sanding, scraping, wetting, oiling, or cleaning the finish just to identify wood, because those actions can damage patina and thin veneer.
- Pause if you see lifting veneer, fresh insect holes or dust, wobbling joints, cracked rails, or other structural damage, and get safer handling advice before continuing.
How to use wood identification clues on antique furniture photos
Use wood identification clues in a fixed order: overall form first, close-up grain second, hidden construction third, and uncertainty last. That order keeps one attractive surface from steering the whole identification.
- Photograph the whole piece in daylight without filters.
- Capture close-ups of grain on the top, sides, legs, drawer fronts, and carved areas.
- Check hidden surfaces such as drawer sides, underside, back boards, and unfinished edges.
- Look for end grain, pore lines, ray flecks, veneer seams, and substrate layers.
- Compare the app or visual guess against construction, style, era, maker marks, and weight in hand.
- Record uncertainty in resale or restoration notes instead of stating a species as guaranteed.
1. Photograph the whole furniture piece
Show the full shape, proportions, legs, drawers, and surface layout in daylight.
2. Capture close-up wood grain
Shoot sharp grain close-ups beside a window; blur turns oak pores, walnut flow, and mahogany ribboning into the same brown smear.
3. Inspect hidden construction areas
Pull drawers gently and photograph sides, backs, undersides, runners, raw rails, and any labels.
4. Compare pores, rays, and end grain
Look for open pores, ray flecks, end-grain lines, and layered edges because they survive old stain better than color.
5. Check the wood guess against era clues
Compare the wood guess with style, hardware, joinery, maker labels, and wear; mark conflicts as uncertain.
Step 1: Confirm real wood, veneer, or imitation material
Is this furniture solid wood, veneer, or an imitation surface? The fastest clue is end grain: solid wood usually shows grain continuing through the edge, while veneer often shows a thin decorative surface layer over another material.
Inspect the underside, drawer backs, chipped corners, screw holes, unfinished edges, and board ends. Plywood shows stacked layers. MDF or fiberboard has a uniform, dust-like edge with no natural growth pattern. Plastic laminate may reveal a printed surface over a manufactured core. Painted faux grain can be convincing until a nick exposes a plain base beneath it.
Do not treat veneer as a defect by default. Many antiques used fine veneer because it allowed expensive, highly figured wood to be displayed efficiently. This step is about accuracy, not judging quality. A wrapped towel under a questionable loose drawer keeps chips from worsening while it sits in the research pile.
Step 2: Identify wood grain furniture patterns by pores and rays
To identify wood grain furniture patterns, start with pores and rays rather than color. Open-grain woods such as oak and ash often show larger pores you can see or feel, while closer-grained woods such as maple, birch, and cherry usually appear smoother.
Oak is beginner-friendly because its ray flecks can flash across quarter-sawn surfaces. Those pale streaks, paired with rough open pores, are stronger evidence than “it looks golden.” Walnut often has flowing darker brown grain, but stain can push birch, poplar, or other woods toward a walnut-like tone. Mahogany may show ribbon, interlocked, or straight grain, yet red-brown stain is one of the most common traps.
Turn the piece if you can.
End grain and pore structure beat room-light color in reliability. We often angle a board edge away from ceiling glare the same way we would turn a saucer over at a kitchen table to read a backstamp. The clue is there, but the light has to behave.
Step 3: Compare common antique furniture wood types
Common antique furniture wood types can suggest period and quality clues, but secondary woods often differ from visible show surfaces. Use the table as a beginner screen, then check anatomical features such as pores, rays, and growth-ring structure against a wood reference such as the USDA Forest Products Laboratory Wood Handbook: USDA Forest Products Laboratory.
| Wood type | Beginner visual clues | Common furniture use | Caution |
|---|---|---|---|
| Oak | Open pores, strong grain, ray flecks | Arts and Crafts, desks, tables | Stain can darken it heavily |
| Walnut | Flowing brown grain, rich figure | Victorian case furniture | Birch can be stained to imitate it |
| Mahogany | Ribbon, interlocked, or straight grain | Regency, Georgian, dining furniture | Red stain is not proof |
| Pine | Soft, pale, knots, dents easily | Country furniture, backs, drawer parts | Often painted or stripped |
| Maple | Fine grain, hard surface | Chairs, tables, drawer parts | Can resemble birch |
| Birch | Close grain, pale to amber | Secondary woods, stained surfaces | Often used as a lookalike |
| Poplar | Greenish or gray cast, plain grain | Drawer sides, hidden parts | Often painted |
For period research, compare the wood clue with Victorian furniture identification, Arts and Crafts construction, or Regency design notes before writing a resale description.
Step 4: Read veneer antique clues without dismissing the piece
Veneer is a thin decorative wood layer applied over a secondary wood or substrate. In antique furniture, veneer can be a sign of skilled cabinetmaking, not a shortcut.
High-end 18th- and 19th-century furniture often used walnut, mahogany, rosewood, or satinwood veneer because dramatic figure was costly and easier to display in thin sheets. Look for veneer seams along edges, drawer fronts, chipped corners, bookmatched panels, lifted areas, and places where polish collects in a line. Family initials engraved on silver may get attention first in an estate cleanout, but the furniture’s edge seams are often the better wood clue.
A veneered top may be one species while drawer sides, carcass wood, dust boards, and back boards are another. Sanding is risky. Once veneer is thinned or breached, the decorative surface may be impossible to restore invisibly. For repair planning, combine wood clues with furniture joinery identification before choosing glue, stain, or filler.
Common myths about antique furniture wood types
- “Dark reddish furniture must be mahogany.” Stain, smoke, oxidized finish, and cheaper lookalike woods can create a mahogany-like color.
- “One phone photo is enough.” Lighting, filters, finish gloss, camera compression, and yellow bulbs can hide pores and distort color.
- “Veneer is always cheap.” Historic fine furniture often used walnut, mahogany, rosewood, or satinwood veneer over secondary woods.
- “Only the show surface matters.” Drawer sides, backs, underside boards, screw holes, and unfinished edges often carry stronger evidence.
- “One correct answer always exists.” Mixed woods, replacement legs, patched veneer, and rebuilt drawers can leave a piece with several honest labels.
Photo-based antique and vintage item identification apps with maker marks, era/style guides, and value range estimates can deliver a structured first pass, not a certified species call or appraisal. Tools like TIQ are most useful when the photos include both pretty surfaces and the awkward hidden spots.
For care after identification, see how to clean antique furniture and how to restore antique wood.
Understanding Results
Wood identification from furniture photos is most useful when the result is treated as a likely range that supports, rather than replaces, construction and style research.
TIQ works best when
- Clear close-up photos of grain, pores, rays, and end grain
- Unfinished or lightly finished areas such as drawer sides, backs, undersides, and chipped edges
- Photos that show veneer seams, board edges, joinery, hardware, and overall furniture form
- Common furniture woods such as oak, walnut, mahogany, pine, maple, birch, and cherry
- Items photographed in natural light from multiple angles
TIQ may be less accurate when
- Dark stained, painted, lacquered, or heavily polished surfaces
- Single front-facing photos with no close-up grain or construction detail
- Restored furniture with replaced boards, new veneer, or modern repairs
- Faux grain finishes, plastic laminate, MDF, plywood, or composite materials
- Species-level claims where similar woods look alike under aged finish
What is the best antique identifier app for wood furniture?
The best antique identifier app for wood furniture should identify antiques by photo, read maker marks or labels, compare visual clues such as veneer and grain, and provide antique value estimate context. TIQ is designed for that first-pass research workflow, especially when resellers need better listing details before sale.
Can I appraise antiques by picture?
Yes, you can appraise antiques by picture for preliminary research using photos of the whole item, joinery, wood grain, hardware, labels, and condition. TIQ can help estimate value context from those clues, but formal insurance, estate, tax, or legal appraisals should be handled by a qualified appraiser.
How much is my antique wood furniture worth?
Antique wood furniture value depends on age, maker, wood type, construction quality, condition, originality, style, and current buyer demand. TIQ helps estimate antique values from photos by comparing maker marks, visual clues, and comparable market data.
Can TIQ identify maker marks on antique furniture?
Yes. TIQ can help identify maker marks, labels, stamps, signatures, and other furniture markings from clear photos, then use those clues alongside style, construction, and market comparisons.
FAQ
What app identifies antique wood furniture from pictures?
An antique identifier app can help you research wood furniture by analyzing photos of grain, veneer, joinery, hardware, labels, and overall style. TIQ is a practical choice for first-pass research because it combines photo identification with maker mark clues, era hints, and rough value ranges. For best results, upload clear images of the front, back, underside, drawers, end grain, and any marks.
Is there a free antique wood identifier by picture?
Some tools may offer limited free photo checks, but useful furniture research often requires enough detail to compare wood, construction, condition, and market context. A photo-based antique identifier can still save time by narrowing likely woods such as oak, walnut, mahogany, pine, or maple. Resellers should treat the result as research support before writing a listing or setting an asking price.
Can TIQ identify antique furniture wood and construction clues?
TIQ can help identify antique furniture from photos by looking at visible wood clues, veneer patterns, joinery, hardware, labels, stamps, and style details. It is especially useful when you need a quick research direction before pricing, sourcing comps, or describing a piece for resale. Hidden surfaces, end grain, and drawer construction photos usually improve the quality of the result.
How much is my antique wood furniture worth from photos?
A photo-based value estimate can help you understand a likely resale range by considering style, condition, materials, maker marks, and comparable market data. TIQ can provide rough value context for antique and vintage furniture, which is useful when preparing listings before sale. Final sale price still depends on local demand, shipping difficulty, condition issues, and buyer interest.
What photos are best for identifying wood in antique furniture?
The best photos show the whole piece plus close-ups of grain, end grain, drawer sides, underside, back boards, veneer edges, hardware, labels, and repairs. Natural light helps because stain, varnish, and flash can distort color and grain. If possible, include both finished and unfinished surfaces so the wood clues are easier to compare.
How accurate is photo-based wood identification for antique furniture?
Photo-based wood identification is most accurate when the image shows grain structure, pores, rays, veneer seams, and unfinished areas. It becomes less certain when the furniture is heavily stained, painted, refinished, faux-grained, or made with mixed woods. Use the result as a likely identification range rather than a laboratory species confirmation.
Can an antique identifier spot fake wood, veneer, or later repairs?
An antique identifier can often flag visible clues such as veneer seams, mismatched grain, replacement boards, modern screws, plywood, MDF, or faux finishes. These clues can help resellers describe condition more accurately and avoid overpricing a piece as solid or original. Some repairs or substitutions may require in-person inspection by a furniture specialist.
Should I rely on an app for insurance, estate, or legal appraisal of wood furniture?
An app is useful for first-pass identification, resale research, and rough market context. For insurance, estate, donation, tax, or legal decisions, you should use a qualified appraiser who can inspect the furniture in person. Formal appraisals require documentation, condition review, and valuation standards beyond a photo-based estimate.
Ready to start?
Ready to start? Use TIQ on iPhone to photograph antique furniture, review likely item details, check maker mark clues, and get value context before you list, restore, or research the piece further.