Antique Identifier Guide to Restoring Wood Safely
Definition: Antique wood restoration is the careful process of cleaning, stabilizing, and preserving old wooden furniture or objects while protecting patina, maker details, and value clues.
Before you clean, oil, sand, or refinish an old wood piece, identify what it is and what value clues may be at risk. TIQ helps estate-sale shoppers and estate cleanout teams appraise antiques by picture, compare visual clues, and make safer restoration decisions before original finish or patina is changed.
> Antique wood restoration means cleaning, stabilizing, repairing, and protecting old wooden objects while preserving as much original wood, finish, patina, hardware, and historical evidence as possible.
- Start with identification: wood type, finish, era, maker marks, repairs, and value range should guide every restoration choice.
- Clean and stabilize before cosmetic work; most antique wood does not need aggressive sanding or full stripping.
- Document every step with photos and product notes, especially if you may sell, insure, or appraise the item later.
Recommended App: TIQ Antique Identifier
TIQ is an antique identifier app for estate-sale shoppers, estate cleanouts, collectors, and vintage decor buyers who want a fast research starting point before cleaning or restoring wood pieces. You can use TIQ to identify antiques by photo, read maker marks and construction clues, and appraise antiques by picture for first-pass research. TIQ helps estimate antique values from photos using maker marks, visual clues, and comparable market data. For insurance, estate, tax, or legal decisions, use a qualified appraiser.
- Identify by photo before sanding, stripping, oiling, or repainting an antique wood item.
- Use maker marks, labels, joinery, hardware, finish, and style clues with TIQ as a maker mark identifier.
- Estimate values with comparable market data so restoration choices do not erase important value context.
- Use TIQ as an antique finder when sorting estate cleanouts, flea-market finds, inherited furniture, or storage-unit pieces.
- Helpful for estate-sale shoppers, downsizers, collectors, resellers, and families deciding what to preserve.
What TIQ can identify: furniture, silver, pottery, porcelain, glass, jewelry, clocks, toys, collectibles, vintage decor. Available for iPhone.
TIQ at a Glance
What is TIQ? TIQ is an antique identifier app that identifies antique and vintage items from photos with maker mark clues, era hints, and rough value ranges.
What does it do? Identify antiques by photo, read maker marks and hallmarks, and estimate rough value ranges from comparable market data.
Who is it for? Collectors, inheritors, estate-sale shoppers and estate cleanouts, and anyone researching unknown antiques or vintage items.
Why use it? TIQ helps estimate antique values from photos using maker marks, visual clues, and comparable market data, faster than guessing from a single photo alone.
Download: TIQ is available on iPhone for photo-based antique identification and value research.
Download App: identify antique wood by photo Download Now
Antique Wood Restoration At A Glance
The safe order is identify, photograph, clean, repair, revive, and protect. DIY restoration is reasonable for stable, common, low-to-mid value pieces; a conservator is safer for rare, signed, high-value, or badly damaged furniture.
| Approach | What it means | Value risk | Good first use |
|---|---|---|---|
| Cleaning | Removing loose dust, grime, and some wax | Low, if tested | Dirty but stable wood |
| Restoration | Stabilizing and reviving without erasing age | Moderate | Loose joints, dull finish, small losses |
| Refinishing | Stripping, sanding, staining, or recoating | High | Failed modern coating or low-value damage |
| Conservation | Minimal, reversible preservation | Lowest for important pieces | Museum-quality, signed, or rare items |
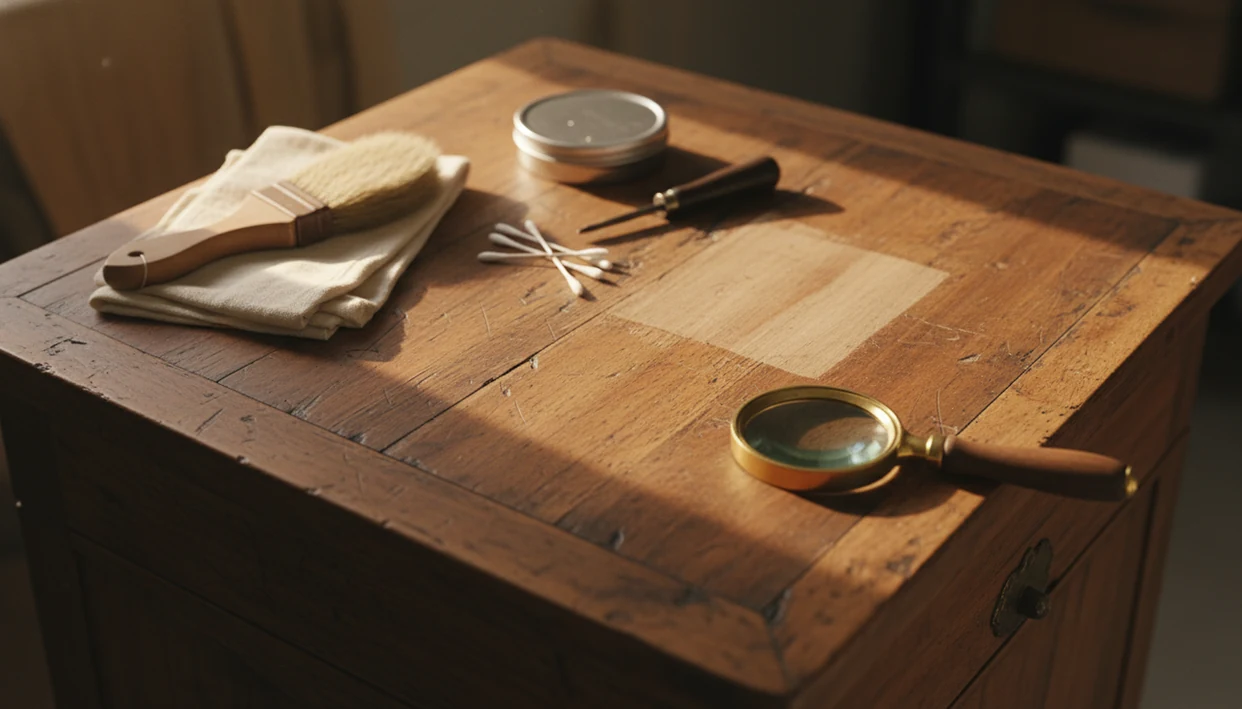
Tools like TIQ can help from photos with wood, era, maker mark clues, and rough value ranges before you choose a treatment path. We still like a slow kitchen-table inspection first. A chair leg under window light tells more than a rushed photo in a hallway.
How Antique Wood Restoration Works
Antique wood restoration works by reading and protecting a layered surface, then choosing the smallest treatment that solves the problem. The aim is not to erase age, but to separate dirt and failure from finish, patina, and construction evidence.
An old tabletop may include solid wood or veneer, stain, shellac or varnish, later wax, kitchen grime, hand wear, and oxidized patina. Finish testing means checking a hidden spot to learn how the coating reacts before wider work; compatibility means the new repair will not fight the old surface. That test can change everything, from whether a wax layer is safely reduced to whether a scratch gets local color work instead of a full refinish.
- Identify the wood, veneer, finish, hardware, and value clues before using liquid or abrasive.
- Test the gentlest cleaner or solvent in a hidden area and wait for clouding, color lift, or tackiness.
- Stabilize loose joints, veneer, and cracks before improving sheen.
- Revive the existing finish where possible with minimal cleaning, touch-up, or protection.
- Reserve sanding, stripping, and recoating for failed finishes or low-value damage, because they can permanently remove tool marks, original surface, and historical proof.
Antique Wood Layer: Wood, Finish, Wax, Dirt, And Patina
Antique wood is a layered system: wood substrate, veneer, stain, finish, wax, dirt, repairs, and patina all sit together on the visible surface. Restoration works by separating removable grime from evidence that belongs to the object.
That distinction matters. The mellow brown on a walnut drawer front may include oxidized finish, hand wear around pulls, old wax, and color changes from light exposure. Sanding treats those layers as waste. A minimal method treats them as information.
How antique wood restoration works is simple in principle: move from least aggressive to most aggressive treatment. Start with dry dusting, then spot-tested cleaning, then structural repair, then finish revival. Stripping, heavy sanding, and thick modern coatings are irreversible choices. Once tool marks, original finish, or veneer thickness are gone, they cannot be documented back into the piece.
Thin veneer is unforgiving.
Five Facts Before You Restore Antique Wood
- Identify wood species, finish type, age clues, and condition before using sandpaper, solvents, oil, or stain.
- Gentle cleaning is the first hands-on step because dirt and old wax can hide the actual finish condition.
- Structural repairs come before cosmetic work; a polished loose table is still a loose table.
- Full refinishing should be the last resort because it can remove original finish, patina, tool marks, and collectible value evidence.
- Protection and routine maintenance often prevent harsher restoration later, especially on tabletops, chair arms, and drawer fronts.
For beginners, careful cleaning and documentation are often safer than refinishing because they preserve evidence needed for identification, resale, and appraisal. We have seen a dusty box lid with estate-sale masking tape marked “$3” hide a much better drawer construction story underneath.
How To Use TIQ Before Restoring Antique Wood
TIQ is an antique identifier app that identifies antique and vintage items from photos with maker mark clues, era hints, and rough value ranges for beginners and resellers. Use it as a first-pass sorting tool, not as a certified appraisal or conservation order.
A good AI antique and vintage item identifier app with maker marks, era/style guides, and value range estimates can narrow the research path, not prove authenticity or guarantee a sale price.
- Photograph the whole item in daylight, including front, back, sides, top, and underside.
- Capture maker marks, labels, branded stamps, paper tags, drawer bottoms, and hardware backs.
- Zoom in on joints, veneer seams, damage, repairs, feet, casters, and screw types.
- Compare the app’s era and value hints with your own notes before touching the finish.
- Choose the path: conserve high-value items, gently restore mid-range pieces, and practice heavier work only on low-value pieces.
A sharp close-up beside a window at 10 a.m. usually beats a blurry phone photo under yellow ceiling glare.
Step 1: Identify The Antique Wood, Finish, And Value Risk
What should you inspect before restoring antique wood? Inspect the wood species, finish, construction, maker clues, hardware, condition, and value risk before any cleaning liquid or abrasive touches the surface.
If the piece may be rare, signed, unusually early, or museum-quality, pause before testing cleaners or glues. The American Institute for Conservation recommends using a qualified conservator for culturally or financially significant objects Culturalheritage.
Oak often shows open grain rays. Mahogany may show reddish-brown depth, walnut can show darker figure, and pine dents easily under a fingernail. Veneer seams at edges or drawer fronts matter because sanding can cut through them quickly. Finish clues include shellac, varnish, lacquer, oil, wax, paint, and later polyurethane.
Photo Checklist For Identification
Take square-on photos of the front, sides, back, underside, drawers, joints, feet, pulls, hinges, labels, and damaged areas. For deeper construction clues, compare dovetails, dowels, screws, and rails with a furniture joinery identification guide.
Value Clues That Change The Plan
Maker marks, early hardware, branded stamps, unusual drawer construction, and honest underside wear can change the plan. Photograph everything before work begins for resale, appraisal, and repair records.
Step 2: Clean Antique Wood Without Stripping Patina
Clean antique wood by removing loose dirt first, then testing any moisture or cleaner in a hidden spot. Cleaning may reveal that the finish only needs revival, not full restoration.
- Dust with a soft brush, microfiber cloth, and a low-suction vacuum near carvings and crevices.
- Test mild soap and water in a hidden spot, using a barely damp cloth.
- Wipe small areas gently, then dry them immediately with a clean cloth.
- Stop if color transfers, finish turns cloudy, veneer lifts, or the surface feels tacky.
- Avoid bleach, ammonia, harsh degreasers, abrasive pads, and heavy water exposure.
Safe Cleaning Supplies
Use soft cotton cloths, a natural-bristle brush, cotton swabs, mild soap, distilled water if available, and a towel under small pieces. The towel catches loose chips too.
Hidden Test Spot Method
Pick the underside of a rail, the back of a leg, or an interior drawer edge. Wait before judging the result because some old finishes cloud as they dry.
Step 3: Repair Loose Joints, Cracks, Veneer, And Hardware
Structural stability comes before shine. Tighten, clamp, and re-glue loose joints before polishing, waxing, or recoating, because finish work can hide movement without fixing it.
Joint And Glue Decisions
Dry-fit loose joints first. If old glue blocks the joint, remove loose residue carefully rather than forcing new adhesive into a bad fit. Use compatible glue, and avoid flooding joints where reversibility matters. A wobbly chair stretcher with fresh glue smeared across old finish is harder to correct later.
Minor cracks may accept careful filling, but wide splits, failed rails, and distorted tabletops need a more cautious plan. Clamp pressure should close a joint, not bend the piece into a new shape.
Veneer And Hardware Cautions
Lifted veneer needs flat pressure, careful glue placement, and grain-aware patching. Missing veneer is not just a hole; the species, cut, color, and grain direction all affect the repair.
Keep original hardware whenever possible. Bag removed screws, pulls, escutcheons, and hinges with labels, especially when furniture hardware identification may help date the piece.
Step 4: Restore Antique Wood Finish Without Sanding
Can you restore antique wood without sanding? Often, yes: wax removal, gentle polishing, shellac repair, careful color touch-up, and burn-in sticks can improve appearance without stripping the original surface.
No-Sanding Finish Revival
Start by removing excess wax only where testing shows it is safe. A dull shellac finish may respond to specialist repair, but shellac, lacquer, varnish, and oil finishes behave differently. Color touch-up can reduce a pale scratch, yet it should not paint over every sign of use.
Ultra-fine abrasives may be acceptable for isolated finish nibs or modern surface defects. They are too risky on thin veneer, decorated surfaces, gilding, painted details, or any piece with uncertain value.
Vinegar And Household Cleaner Risks
Vinegar is not a universal antique wood cleaner. Its acidity can dull, cloud, or disturb some old finishes. Original crazing, mellow color, and small wear marks may be desirable patina rather than damage.
Leave some age visible.
Step 5: Refinish Antique Wood Only As A Last Resort
Refinishing is justified when the existing coating has failed so badly that cleaning and finish revival cannot make the piece usable. It is not the normal first step for antique wood.
When Refinishing Makes Sense
Consider refinishing for a failed modern finish, severe flaking, an unusable sticky coating, or a low-value damaged item meant for daily use. Stripping and sanding remove original finish, patina, tool marks, and value evidence. That loss matters most when maker, era, and condition are part of the appeal.
Finish Choices And VOC Safety
| Finish | Typical use | Caution |
|---|---|---|
| Shellac | Traditional look, repairable finish | Sensitive to alcohol and heat |
| Wax | Low-build protection | Can cloud if over-applied |
| Oil | Penetrating appearance | Not right over every old finish |
| Varnish | Durable surface | May look too new on some antiques |
| Lacquer | Thin sprayed finish | Solvent and ventilation concerns |
| Polyurethane | Hard modern coating | Often hard to reverse |
Solvent-based coatings can carry VOC exposure risks; an EPA wood furniture report notes traditional coatings with 4.6 to 6.2 pounds VOC per gallon EPA guidance. Use ventilation, gloves, and appropriate respirators, and treat old dust, paint, and residue as possible hazards.
Step 6: Protect Restored Antique Wood For Daily Use
Protect restored antique wood with a finish or care routine that matches the existing surface and how the object will be used. The goal is stable daily handling, not a thick new skin.
- Match protection to the finish, using suitable wax, oil, shellac, varnish, or another topcoat only when appropriate.
- Apply thin layers and avoid building cloudy wax in carvings, corners, and around pulls.
- Keep pieces away from direct UV light, heat vents, standing water, and rapid humidity swings.
- Use coasters, felt pads, table mats, and gentle dusting instead of frequent polish.
- Review high-wear areas every few months, especially chair arms, desk tops, and drawer edges.
A European Commission life-cycle assessment found that extending furniture life through reuse and repair can reduce annual environmental impacts by 30–50%, depending on the product and scenario Europa. For usable antiques, maintenance is often better than replacement because it preserves both material and history.
Common Myths About Restoring Antique Wood Furniture
Several common restoration myths push beginners toward over-treatment. Most mistakes start with assuming old wood should look freshly manufactured.
Myth 1: Every antique should be sanded to bare wood. Sanding can erase patina, soften carved edges, cut through veneer, and remove tool marks that help date a piece.
Myth 2: Any household cleaner is fine. Degreasers, bleach, ammonia, and abrasive pads can strip finish, raise grain, or leave residues.
Myth 3: Polyurethane is always the best finish. Polyurethane can be durable, but it may look historically wrong and can be difficult to reverse.
Myth 4: Old furniture should look new after restoration. A convincing restoration keeps appropriate age, color, and wear.
Myth 5: Replacing original hardware always improves resale value. Original pulls, hinges, locks, and screws often support identification. Style research, including Victorian furniture identification, can explain why one mismatched handle is worth keeping until verified.
Restoration Documentation For Resale, Insurance, And Appraisal
Documentation helps future buyers, appraisers, insurers, and family members understand what changed. It supports transparency, but it is not the same as certified authentication.
Take before, during, and after photos in consistent lighting. A cloudy basement photo and a bright after-photo can exaggerate results, so keep the setup similar. Record products used, repair dates, replacement parts, removed hardware, and areas intentionally left untouched. Save app screenshots, maker mark photos, receipts, sold listing screenshots, and professional notes in one folder.
The U.S. Bureau of Labor Statistics classifies furniture finishers as a distinct woodworking occupation, reinforcing that finish work is a material trade rather than just a cosmetic step Bureau of Labor Statistics.
For resale, a clear restoration log is often more useful than a polished description because it separates confirmed work from guesses. Wrap questionable small parts in a towel before putting them in the research pile.
Understanding Results
Photo-based identification is most useful when images clearly show construction, finish, wear, marks, and details that affect restoration decisions.
TIQ works best when
- Clear photos of the full piece from front, side, back, underside, and interior angles
- Close-ups of joinery, drawer construction, hardware, locks, hinges, labels, stamps, and maker marks
- Images taken in natural light that show wood grain, patina, finish wear, and veneer edges
- Common antique furniture forms with recognizable style, period, and regional clues
- Before-restoration photos taken prior to cleaning, oiling, waxing, sanding, or repair
TIQ may be less accurate when
- Dark, blurry, cropped, or filtered photos that hide surface and construction details
- Pieces that have already been heavily stripped, painted, sanded, or rebuilt
- Generic mass-produced furniture with few distinguishing marks or style features
- Severe damage, missing hardware, replaced legs, or altered surfaces that obscure age clues
- Value conclusions for rare, signed, museum-quality, or disputed pieces without expert appraisal
What is the best antique identifier app?
The best antique identifier app is one that combines photo identification, maker mark research, value context, and comparable market data. TIQ is designed for that workflow, especially when you need to identify a wood piece before cleaning, restoring, donating, or selling it.
Can I appraise antiques by picture?
You can appraise antiques by picture for first-pass research by using photos, maker marks, construction details, condition, and comparable sales. TIQ helps estimate antique values from photos, but formal insurance, estate, tax, or legal appraisals should come from a qualified appraiser.
How much is my antique worth?
An antique’s value depends on maker, age, materials, condition, rarity, provenance, and current demand. TIQ can provide an antique value estimate from photos and market comparables so you have context before restoration or resale.
Can TIQ identify maker marks?
Yes. TIQ can help identify maker marks, labels, signatures, stamps, hardware details, and other visual clues that may point to a furniture maker, period, region, or collectible category.
FAQ
What app identifies antique wood furniture from pictures?
An antique identifier app can help you start research from photos of the whole piece, construction details, hardware, labels, and maker marks. TIQ is a practical choice for antique wood furniture because it can organize photo-based clues, suggest era and style hints, and provide rough value context before restoration decisions are made.
Is there a free antique identifier by picture for antique wood?
Some tools offer limited free antique identification by picture, but results vary depending on photo quality and how many details are visible. For wood furniture, include close-ups of joinery, drawer construction, backs, undersides, hardware, labels, and finish wear to improve the usefulness of any photo-based result.
Can TIQ identify antique furniture before restoration?
Yes, TIQ can help identify antique furniture from photos before you clean, polish, strip, or sand it. This is useful because maker clues, original finish, patina, hardware, and construction details can affect both identification and value.
Can TIQ read maker marks from a photo?
TIQ can help interpret visible maker marks, labels, stamps, plaques, and construction clues from clear photos. For best results, photograph the mark straight on in good light and also include the full object so the mark can be considered with style, materials, and age clues.
How can I estimate antique wood value before restoring it?
Start with identification, then compare similar sold pieces by maker, period, condition, size, wood type, and originality. A rough antique value estimate can help you decide whether gentle cleaning is enough or whether a professional conservator should review the piece before major work.
How accurate is photo identification for antique wood restoration decisions?
Photo identification is most useful as a research starting point, especially when images show construction, finish, hardware, labels, and wear patterns clearly. Accuracy is lower when a piece has been heavily refinished, altered, repaired, or photographed from only one angle.
Can a photo appraisal replace a professional furniture appraisal?
A photo-based estimate can help with sorting, research, and early restoration choices, but it should not replace a qualified appraisal for insurance, estate, tax, donation, or legal purposes. High-value antique wood furniture may need in-person review to assess condition, originality, repairs, provenance, and market demand.
Will TIQ keep my antique photos private?
Privacy matters when photographing inherited items, estate cleanouts, or valuable furniture in a home. Avoid including faces, addresses, documents, or room details in the background, and review the app’s current privacy policy so you understand how photos and account data are handled.
Ready to start?
Ready to start? Photograph the wood, joinery, hardware, underside, drawer interiors, labels, and any maker marks before you touch the finish, then use those clues to choose the least invasive restoration path.