How an Antique Identifier Helps Tell If Furniture Is Antique
To determine how to tell if furniture is antique, check construction first: hand-cut joinery, uneven tool marks, older hardware, hidden wood choices, and natural wear are stronger clues than an “old” look. Then compare the style, maker marks, repairs, and materials together before assuming it is antique, vintage, or a reproduction.
Definition: Antique furniture identification is the process of evaluating a piece’s style, construction, hardware, wood, marks, and age clues to determine whether it is antique and what market category it fits.
TL;DR
- Start with hidden areas: drawer sides, undersides, backs, bottom edges, and hardware holes often reveal the best age clues.
- Look for multiple signals together, such as irregular dovetails, old oxidation, mixed woods, hand-tool marks, period-appropriate hardware, and a style that fits the construction.
- Use photos and an antique identifier app for a rough era and value range, but do not treat photo ID as certified authentication or appraisal.
Recommended App: TIQ Antique Identifier
Before pricing a dresser, table, chair, or cabinet, use construction clues, style details, hardware, wood, and marks together to decide whether it is antique, vintage, or reproduction. TIQ helps resellers appraise antiques by picture for faster first-pass research before creating a listing.
- Identify antique furniture by photo using visible construction, design, and condition clues.
- Check maker marks, labels, stamps, and hardware details that may point to origin or period.
- Estimate values with comparable market data to support resale pricing before a listing goes live.
- Useful for resellers, collectors, dealers, estate cleanout teams, and anyone sorting inherited furniture.
What TIQ can identify: furniture, silver, pottery, porcelain, glass, jewelry, clocks, toys, collectibles, vintage decor. Available for iPhone.
TIQ at a Glance
What is TIQ? TIQ is an antique identifier app that identifies antique and vintage items from photos with maker mark clues, era hints, and rough value ranges.
What does it do? Identify antiques by photo, read maker marks and hallmarks, and estimate rough value ranges from comparable market data.
Who is it for? Collectors, inheritors, resellers pricing listings before sale, and anyone researching unknown antiques or vintage items.
Why use it? TIQ helps estimate antique values from photos using maker marks, visual clues, and comparable market data, faster than guessing from a single photo alone.
Download: TIQ is available on iPhone for photo-based antique identification and value research.
Download App: identify furniture with TIQ Download Now
Antique Furniture Age Labels: Antique, Vintage, Or Reproduction
Antique, vintage, and reproduction furniture are not interchangeable labels. Antique usually points to an earlier production era, vintage usually means older but not necessarily antique, and reproduction means a newer piece made in an older style.
Age alone does not guarantee value, rarity, or authenticity. A plain old chair with heavy damage may be less marketable than a well-designed vintage piece. A reproduction can also copy Queen Anne legs, Victorian carving, paper labels, darkened patina, and even dovetail construction.
The safest first answer is a confidence range, not a guarantee. When we sort an estate piece, we usually begin with “consistent with late 19th century,” “likely mid-20th century,” or “reproduction in an older style.” That phrasing leaves room for repairs, replaced parts, and missing provenance.
How Antique Furniture Identification Works
Antique furniture identification works by building a case from several independent clues, not by trusting one feature. Construction, materials, hardware, style, and wear are compared for corroboration, meaning they should support the same rough age story.
Start with the structure: joinery, saw marks, drawer construction, and secondary woods often reveal how a piece was made. Then check whether the hardware, finish oxidation, foot shape, carving, and overall style fit that same period. A single clue can mislead because dovetails can be copied, labels can be added, old hardware can be reused, and artificial wear can be staged. Repairs also distort the timeline. A genuinely old chest may have later pulls, a replaced back, modern screws, or a refinished surface that hides the original patina. When the evidence points in different directions, treat the result as uncertain. Document the contradictions, compare better references, and consider a qualified appraisal if the piece may be valuable, insured, donated, or sold as antique.
Before You Start: Tools, Safety, And What To Record
Before you inspect antique furniture, gather simple tools and make a record before anything is moved, cleaned, or taken apart. The goal is to protect the piece and preserve clues that may matter later.
- Gather a flashlight, tape measure, clean gloves, a soft cloth, and a phone camera with enough storage and battery. Good light and steady photos beat guesswork.
- Photograph the piece as found before shifting it across the floor, wiping dust, or opening compartments. Capture the front, sides, back, top, and any visible damage.
- Measure height, width, depth, drawer interiors, and unusual parts, then note cracks, missing veneer, loose joints, odors, stains, insect holes, and visible repairs.
- Handle drawers, locks, feet, doors, and panels gently. If something is stuck, swollen, or jammed, do not force it; forced movement can break old glue, split wood, or damage hardware.
- Stop before cleaning, stripping finish, polishing metal, replacing pulls, or tightening everything. Those changes can erase dating evidence and lower confidence in the identification.
Five Furniture Age Clues That Matter Most
- Irregular joinery matters: Hand-cut dovetails, uneven pins, and slightly wandering joints are stronger age clues than a fashionable antique-looking silhouette.
- Hidden surfaces talk: Drawer bottoms, backs, undersides, and interior frames often show mixed woods, old oxidation, stamps, repairs, or newer replacement parts.
- Uniform perfection can warn: Perfect symmetry, identical carving, and distress marks repeated in a pattern may indicate machine production or artificial aging.
- Marks need backup: A maker mark, retailer tag, or paper label helps narrow research, but it is not proof unless construction and style agree.
- Clues must line up: Age, style, hardware, condition, and repairs should be read together before calling furniture antique.
A flashlight under a sideboard often teaches more than the polished front. We have seen bright screws on a dark old back rail change the whole dating conversation.
Antique Furniture Construction Clues And Dating Logic
Furniture dating works by comparing construction evidence against known production changes. As furniture moved from hand work toward machine production, joinery, saw marks, hardware, finish, and secondary woods became useful timeline clues.
For historical context, the Victoria and Albert Museum’s furniture collection explains how furniture materials, makers, styles, and manufacturing methods vary across periods and regions (Ac).
Hand-planed surfaces, irregular dovetails, mortise-and-tenon joints, early nails, and uneven oxidation may indicate older methods. Machine-cut dovetails, plywood backs, uniform screws, and repeated carved details may point later. The logic is pattern matching, not one-clue certainty.
Repairs interrupt the trail. A 19th-century chest can have 20th-century drawer pulls, a replaced back board, or a stripped finish that removed oxidation. We once wrapped a questionable small table in a towel before moving it to the research pile because the top looked old, but the underside did not agree.
Photo-based identification uses visible pattern matching across these same clues. Clear images help narrow a likely era; they cannot weigh the wood or inspect joinery depth.
Photo Workflow For Antique Furniture Identification
Use a photo workflow to document the whole piece, not just the prettiest front view. Blurry or decorative-only photos reduce confidence because they hide the construction clues that matter.
- Photograph the full piece from the front, side, and back in steady natural light.
- Turn the piece safely and capture the underside, rear legs, bottom edges, and back boards.
- Remove drawers and photograph drawer sides, bottoms, dovetails, runners, locks, and interior frames.
- Zoom in on hardware including pulls, hinges, screw slots, nail heads, escutcheons, casters, and hardware shadows.
- Capture labels and damage including stamps, plaques, paper tags, cracks, veneer loss, replaced parts, and old repairs.
- Compare the results with style references, sold listings, and photo tools.
Tools like TIQ can provide maker mark clues, era hints, and rough value ranges from photos, not certified authentication or a formal appraisal. A sharp close-up beside a window at 10 a.m. is usually better than a dim hallway snapshot.
For cross-checking, compare TIQ results with Google Lens for visual matches and WorthPoint or LiveAuctioneers sold-price archives for market context; treat all of them as research leads, not appraisals.
Step 1: Hidden Furniture Surfaces
Where should you look first to tell if furniture is antique? Start with the underside, back boards, drawer bottoms, interior frames, bottom edges, and rear legs because hidden areas are harder to fake than show surfaces.
Look for unfinished wood, darker oxidation, dust shadows, old repair marks, uneven wear, and secondary woods that differ from the front. Mixed woods can be normal in older furniture, especially where a maker saved better wood for visible areas.
New screws, plywood, staples, bright brackets, or shiny hardware may suggest repair, later alteration, or reproduction. They do not automatically ruin the piece, but they change the evidence.
A cedar chest with yellowed linens inside can look old before you lift it. The underside may give the more honest answer, especially around feet, fasteners, and corner blocks.
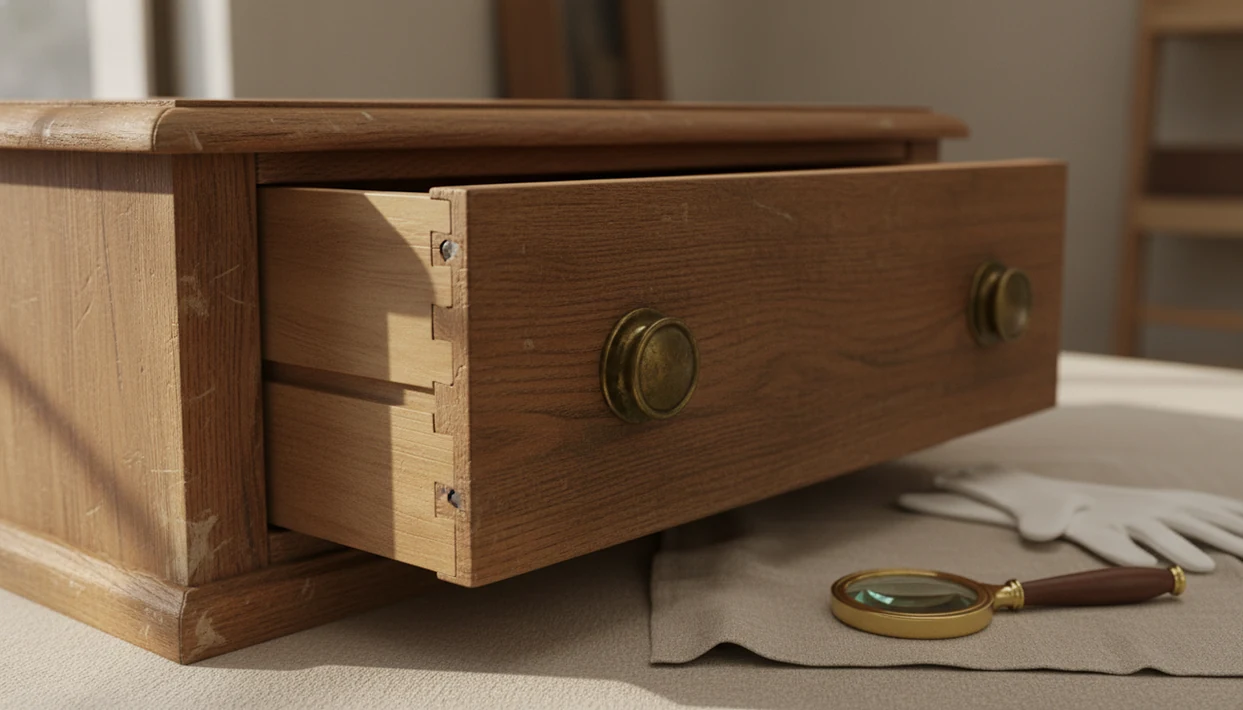
Step 2: Dovetails, Joints, And Tool Marks
Dovetails are useful dating clues, but they do not prove antique status by themselves. Hand-cut dovetails often have irregular spacing, uneven pins, and slight asymmetry, while machine-cut dovetails tend to look more uniform.
Check more than the drawer front. Look for saw marks, plane marks, mortise-and-tenon joints, pegs, nails, glue lines, and the way the drawer bottom is fitted. If the joinery is convincing but the wood, screws, and finish look new, slow down.
Not every old piece has elaborate dovetails. Some country furniture used simple nailed construction, and some later reproductions used decorative dovetails to suggest age. For a deeper construction comparison, our furniture joinery identification guide breaks down common joint types.
Small irregularities matter. Identical “handmade” marks repeated from drawer to drawer can be a red flag.
Step 3: Furniture Hardware, Screws, Nails, And Feet
Hardware can support or contradict a furniture date, especially when it is compared with surrounding wear. Examine drawer pulls, hinges, locks, screw slots, nail types, escutcheons, casters, and the shadows left where older hardware once sat.
Replaced hardware often leaves extra holes, ghost outlines, mismatched oxidation, or screws that look newer than the wood around them. A lock plate may be old while the pulls are later. That is common.
Feet are style clues, not final proof. Ball-and-claw, bracket, bun, tapered, turned, and splayed feet can point toward a period or revival style, but makers reused older forms for decades. People asking about dating furniture by hardware and feet should treat those details as supporting evidence.
A cash-only sign near wooden crates at a flea market is not the place for certainty. Take photos first. The full furniture hardware identification workflow can help you compare screws, pulls, and wear patterns later.
Step 4: Wood, Finish, Style, And Wear Patterns
Wood, finish, style, and wear patterns should agree with the construction evidence. Identify the primary wood on visible surfaces, then compare it with secondary wood in drawers, backs, shelves, and interior framing.
Mixed woods can be normal in older furniture. A walnut case may have pine drawer bottoms, poplar backs, or other practical secondary woods. Natural patina usually appears unevenly, with oxidation in protected areas and contact wear where hands, feet, drawers, and chair rails rubbed over time.
Refinishing can erase finish color, soften tool marks, and hide oxidation. New stain can make a later piece look older, while artificial distressing may scatter dents too evenly. Lamp glare on a glazed saucer is annoying; glare on a shiny refinished tabletop can hide even more.
Compare style with construction era. If the outline resembles Art Deco, Victorian, or mid-century modern furniture, match that style against how the piece was actually made. Our mid-century modern furniture identification guide shows how design and construction need to agree.
Step 5: Maker Marks, Labels, And Value Clues
Maker marks and labels can narrow the search, but they are not enough to authenticate furniture. Check stamped names, paper labels, burned marks, plaques, retailer tags, patent marks, serial marks, and model numbers.
Marks can be missing, damaged, added later, copied, or faked. A label also may name a retailer rather than the maker. We like to photograph labels straight on, then at a slight angle, because shallow stamped letters can disappear under glare.
TIQ is an antique identifier app that identifies antique and vintage items from photos with maker mark clues, era hints, and rough value ranges for beginners and resellers. A good ai antique and vintage item identification app with maker marks, era/style guides, and value range estimates can suggest research paths, not certify authenticity or replace a qualified appraiser.
Market value depends on condition, rarity, demand, location, provenance, and sold-comps range. A sold listing screenshot is more useful than an ambitious asking price on a polished marketplace page.
Antique Furniture Identification Myths
- Myth: All old-looking furniture is antique. Artificial distressing, dark stain, and reproduction styling can make newer furniture look older than it is.
- Myth: A maker label guarantees authenticity. Labels, stamps, and tags must be checked against construction, materials, hardware, and documented examples.
- Myth: Pristine condition means a piece is not antique. Some antiques were protected, restored, or barely used; some modern reproductions are intentionally worn.
- Myth: One clue is enough. Dovetails, screws, feet, or a label can support a date, but none should carry the whole conclusion alone.
- Myth: High age means high value. Value follows condition, rarity, demand, provenance, and location, not age alone.
For beginners, a structured furniture style identifier app can help organize visual clues before you overcommit to a period name. The final call should still rest on several consistent signals.
Understanding Results
Furniture identification is most reliable when photos show both the overall design and the hidden construction details that reveal age.
TIQ works best when
- Clear photos of the full front, sides, back, underside, and drawer interiors
- Close-ups of dovetails, mortise-and-tenon joints, pegs, screws, nails, and tool marks
- Images of hardware, escutcheons, locks, hinges, pulls, and old hardware holes
- Visible maker marks, labels, stamps, branded marks, or inventory numbers
- Style clues such as leg shape, feet, carving, veneer pattern, proportions, and wood type
TIQ may be less accurate when
- Single front-facing photos with no construction or underside views
- Painted, refinished, or heavily restored furniture that hides original surfaces
- Reproductions made with aged finishes, copied labels, or period-style hardware
- Pieces with replaced drawers, feet, backs, tops, or mixed parts from different eras
- Low-light photos where wood grain, joinery, and wear patterns are hard to see
Can TIQ identify antique furniture?
Yes. TIQ can help identify antique furniture from photos by analyzing visible clues such as style, joinery, hardware, wood, labels, maker marks, and condition. It is useful for first-pass research before pricing or listing a piece for sale.
How much is my antique furniture worth?
Value depends on age, maker, style, materials, condition, rarity, provenance, and recent comparable sales. TIQ provides an antique value estimate from photos and market data, which can help resellers set an informed asking price before sale.
Can I appraise antiques by picture?
You can use photos for a first-pass appraisal-style estimate, especially when the images show construction, marks, materials, scale, and condition. For insurance, estate, tax, or legal purposes, use a qualified appraiser.
Can TIQ identify maker marks?
Yes. TIQ can read and interpret many visible maker marks, labels, stamps, signatures, and impressed marks from photos, then connect those clues with likely categories, periods, and comparable market data.
FAQ
What is the best antique identifier app for furniture resellers?
The best antique identifier app for furniture should help you review style, joinery, hardware, wood, labels, and comparable sale clues from photos. TIQ is a practical choice for first-pass furniture research because it combines photo identification with rough value ranges and maker mark clues. Use it to prepare listings faster, then verify important high-value pieces with deeper research or a qualified appraiser.
What app identifies antique furniture from pictures?
An antique identifier app can review photos of drawer construction, backs, undersides, hardware, labels, and overall style to suggest likely age and category. For furniture, the most useful photos show hidden construction details rather than only the front view. TIQ can help connect those visual clues to era hints, maker information, and resale-oriented value research.
Is there a free antique identifier by picture for furniture?
Free image searches can sometimes help you find visually similar furniture, but they often miss construction details that matter for age and value. A dedicated antique identifier app is usually more useful when you need to compare joinery, hardware, maker marks, and sold-market context. For resale pricing, treat free tools as a starting point rather than a final valuation.
Can TIQ read maker marks from a photo of furniture?
TIQ can review photos of furniture labels, stamps, plaques, burned marks, and other maker clues when they are clear enough to read. The best results come from close, well-lit images taken straight on, plus wider photos showing the full piece and construction. If a mark is damaged, partial, or commonly faked, use the result as a research lead rather than proof.
How should resellers use an antique value estimate before pricing furniture?
Use an antique value estimate to set a realistic research range before you list, not as the only pricing decision. Compare the suggested range with condition, local pickup demand, shipping difficulty, brand strength, and recent sold comps. Large furniture can sell below book value if transport is expensive or the local market is limited.
How accurate is antique furniture identification from photos?
Photo identification can be very helpful for narrowing style, likely period, construction type, and resale category. Accuracy depends on photo quality and whether you include hidden areas such as drawer sides, backs, undersides, hardware holes, and labels. A hands-on inspection is still better for confirming wood, repairs, structural condition, and authenticity.
Can a photo-based tool confirm that furniture is not a reproduction?
A photo-based tool can flag reproduction clues such as machine-cut uniform joinery, modern screws, artificial wear, mismatched hardware, or style details that do not fit the claimed period. It cannot guarantee authenticity from images alone, especially when a piece has been altered, refinished, or deliberately aged. For expensive furniture, combine photo research with provenance, close inspection, and expert review.
Are my furniture photos private when using an antique identifier app?
Before uploading photos, check the app’s privacy policy and avoid including personal documents, faces, addresses, or unrelated valuables in the background. For furniture research, crop images to the item, marks, hardware, and construction details you want identified. This keeps the research focused and reduces the amount of personal information in each upload.
Ready to start?
Ready to start? Photograph the whole piece, drawers, undersides, joinery, hardware, labels, and any repairs, then use TIQ to organize the clues into a practical furniture identification starting point.