An Antique Identifier Photo Guide for Better Results
Clear, complete photos help an antique identifier compare shape, marks, materials, construction, condition, and scale more accurately. Use this guide to appraise antiques by picture more confidently when researching flea market finds, thrift store discoveries, inherited pieces, or items you may want to sell.
Definition: An antique identifier photo guide explains how to photograph marks, materials, scale, condition, and construction details so an item can be researched more accurately.
TL;DR
- Start with full-object photos from the front, back, sides, top, and underside before taking close-ups.
- Prioritize maker marks, labels, hallmarks, signatures, hardware, joints, damage, repairs, and scale references.
- Use identification results as research leads, not certified authentication or formal appraisal evidence.
Recommended App: TIQ Antique Identifier
TIQ is an antique identifier app for turning clear photos of flea market and thrift store finds into structured first-pass research. Use it to identify antiques by photo, read maker marks, compare visual clues, and appraise antiques by picture before deciding what to buy, keep, sell, or research further. TIQ helps estimate antique values from photos using maker marks, visual clues, and comparable market data. For insurance, estate, tax, or legal decisions, use a qualified appraiser.
- Identify by photo: upload overall shots, undersides, close-ups, scale references, and condition details to narrow item type, style, and period.
- Maker marks: photograph stamps, signatures, labels, hallmarks, and impressed marks so TIQ can work as a maker mark identifier.
- Estimate values: use comparable market data and visible condition clues for an antique value estimate before buying or selling.
- Flea market and thrift store finds: quickly research unfamiliar furniture, pottery, silver, glass, jewelry, and collectibles while you are still deciding.
- Who it is for: collectors, resellers, decorators, heirs, and curious shoppers who want an antique finder for visual research.
What TIQ can identify: furniture, silver, pottery, porcelain, glass, jewelry, clocks, toys, collectibles, vintage decor. Available for iPhone.
TIQ at a Glance
What is TIQ? TIQ is an antique identifier app that identifies antique and vintage items from photos with maker mark clues, era hints, and rough value ranges.
What does it do? Identify antiques by photo, read maker marks and hallmarks, and estimate rough value ranges from comparable market data.
Who is it for? Collectors, inheritors, flea market and thrift store finds, and anyone researching unknown antiques or vintage items.
Why use it? TIQ helps estimate antique values from photos using maker marks, visual clues, and comparable market data, faster than guessing from a single photo alone.
Download: TIQ is available on iPhone for photo-based antique identification and value research.
Download App: identify finds with TIQ Download Now
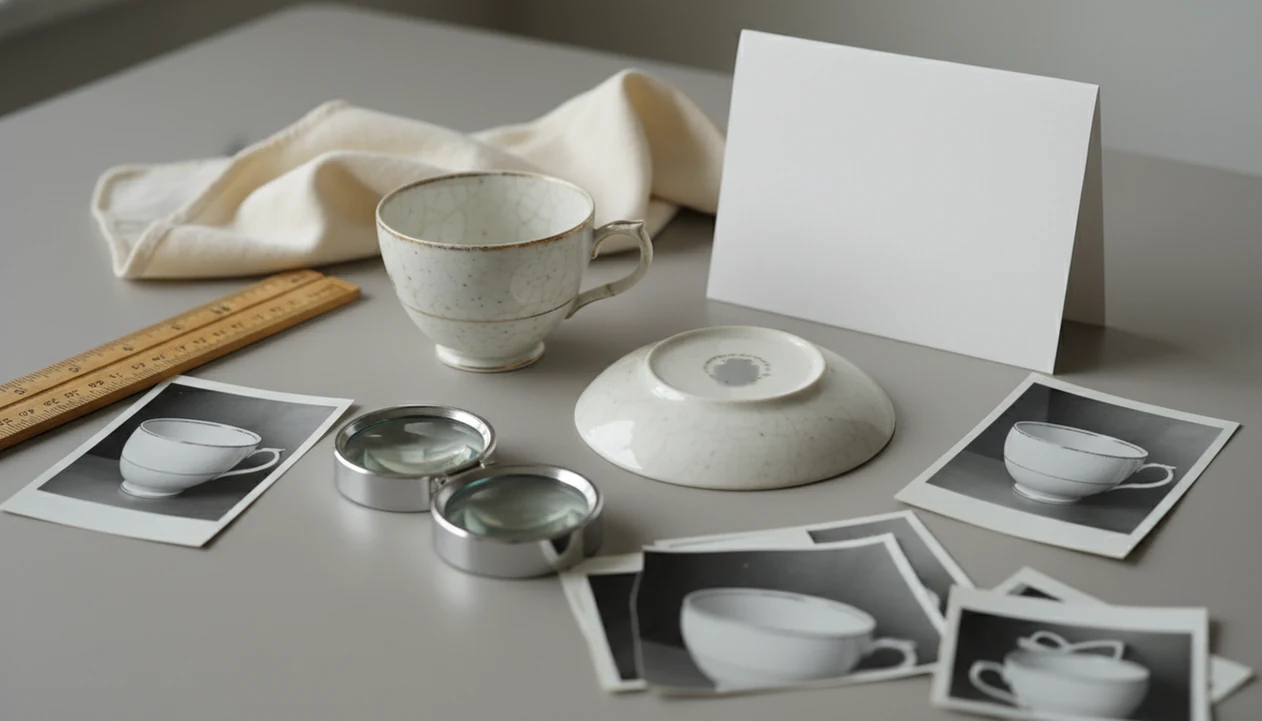
Antique Photo Checklist for Better Identification Results
A useful antique photo checklist includes full views, close-up marks, construction details, condition issues, scale, and provenance. One attractive front photo is not enough because it hides the clues that often decide maker, age, and value range.
- Photograph the front, back, left side, right side, top, and underside before moving the item.
- Capture maker marks, labels, stamps, signatures, hallmarks, serial numbers, hardware, joints, and damage.
- Add a ruler, coin, or tape measure so size is not guessed from the image.
- Use a plain background, sharp focus, and steady light so edges and surface wear are readable.
- Photograph notes, receipts, old tags, or family paperwork separately, not tucked under the object.
A chipped enamel sign behind a flea-market stall may look obvious in person. In a cropped photo, it can turn into a red rectangle with no useful scale or surface detail.
How Photographing Antiques for Identification Works
Antique identification from photos works by comparing multiple visual clues, not by judging one beauty shot. Shape, materials, patina, construction, maker marks, and condition each answer a different research question.
Apps use image matching and visual feature comparison, sometimes called image embeddings. In plain terms, the system looks for patterns in form, marks, and surface details, then compares them with known antique and vintage references. Human specialists do a similar cross-check, but with experience, reference books, and category memory. Turning a saucer over at a kitchen table and angling it away from ceiling glare can reveal a backstamp the front photo never hinted at.
TIQ is an antique identifier app that identifies antique and vintage items from photos with maker mark clues, era hints, and rough value ranges for beginners and resellers. Pew Research Center reported that 76% of cellphone owners used their phone inside a store to help with a purchasing decision, which helps explain why mobile photo research now feels normal at thrift counters and estate sales (Pew Research Center).
Before You Photograph Antique Items for an App
Prepare the photo area before you prepare the antique. Clean the background, not the object, because polishing can remove patina, residues, faint marks, or paper labels worth documenting. For conservation context, the American Institute for Conservation advises cautious handling and care because cleaning choices can permanently affect objects, so document condition before doing anything irreversible (AIC).
Use indirect daylight near a window or soft indoor light from two sides. Avoid flash on silver, glass, glaze, and varnished wood because glare can erase shallow marks. A plain neutral surface works better than patterned fabric, especially for small jewelry, porcelain, tools, or hardware. We have seen green felt hiding a furniture label just enough to make the maker name unreadable.
Set your phone camera grid on, tap the important area to focus, and brace your elbows or use a small tripod. Put a ruler, coin, or tape measure nearby before you start. If you are still learning the phone workflow, our guide to how to identify antiques with phone covers the broader process.
How to Use Photos for an Antique App
Use photo sets in an antique app by submitting the clearest full views first, then the marks and construction details that narrow the result. A good AI antique and vintage item identifier app with maker marks, era/style guides, and value range estimates gives research leads, not certified authentication.
- Set the object against a plain background with even light and no visual clutter.
- Capture full-object views from the front, back, sides, top, and underside.
- Add close-up photos of maker marks, labels, joints, hardware, repairs, and wear.
- Upload the sharpest images to the app, skipping duplicates and blurred shots.
- Review era hints, maker mark clues, category suggestions, and rough value range.
- Cross-check high-value or surprising results against sold listings, reference sites, or a specialist.
Tools like TIQ can help organize first-pass clues, but the better habit is still the same: photograph first, compare second, claim carefully.
For cross-checking, compare TIQ results with named sources such as Google Lens for visual matches, WorthPoint for paid price-history research, and eBay sold listings for recent market comps.
Step 1: Full-View Antique Photos From Every Angle
What full-view photos should I take of an antique? Take the front, back, left side, right side, top, and underside, keeping the entire object in frame with minimal distortion.
These views show silhouette, proportions, style, and category. A chair leg profile, for example, may point toward a furniture era before a label is found. Boxes, cabinets, drawers, cases, and hinged items should be photographed open and closed. That extra view often shows interior construction, replaced lining, or hidden wear.
Stand far enough back that the object is not warped by the phone lens. Then crop later if needed. For a full beginner workflow, the identify antique from photo guide explains how full views and detail shots work together. For many household items, full-angle photography is often better than a single close-up because it preserves form, scale, and style context.
Step 2: How to Photograph Maker Marks and Labels
How do you photograph maker marks on antiques? Take one medium photo showing where the mark sits, then one sharp close-up that fills the frame without cutting off letters, borders, or nearby symbols.
Photograph maker marks, hallmarks, stamps, paper labels, signatures, serial numbers, foundry marks, import marks, and partial impressed marks. Use angled light for shallow marks, especially on ceramics, metal, and worn wood. Flash usually makes shiny marks worse. A dark photo inside a cabinet door may need a small side light and a second attempt beside a window at 10 a.m.
Separate mark photos help when checking hallmark databases, backstamp guides, and style references. If the mark is the main clue, a maker mark identifier app can be useful for first-pass reading, but keep the wider location photo too.
Step 3: Construction, Hardware, Wear, and Damage Photos
Construction and condition photos help distinguish age, quality, repair history, and possible reproductions. They also make value estimates less surprising because damage and replacement parts can change the likely sold-comps range.
Photograph joints, screws, nails, hinges, drawer runners, feet, handles, clasps, backs, and undersides. Show tool marks, casting seams, glaze texture, fabric, stitching, dovetails, and surface wear. A replacement screw in antique hardware is not automatically bad, but it should be visible before anyone estimates value. Same with a rubbed maker mark from over-polishing.
Document cracks, chips, missing parts, repainting, corrosion, restoration, and replaced hardware. Not glamorous. Necessary. If you plan to list the item, these photos reduce buyer disputes and help experts decide whether the item belongs in a keep, sell, donate, research, or appraise pile.
Step 4: Scale and Provenance Photos for Antique Identification
Scale and provenance photos make identification more precise by separating similar-looking objects that differ in size, purpose, or documented history. Include a ruler, tape measure, coin, hand, or standard object in at least one photo.
Record height, width, depth, diameter, and weight when those measurements matter. Photograph receipts, old labels, family notes, inventory tags, auction paperwork, and prior listing printouts separately. A handwritten note tucked in a teapot may support a family story, but it does not automatically prove maker, age, or authenticity.
BLS Consumer Expenditure Survey tables reported that households led by someone 65 or older spent an average of $166 per year on collectibles in 2022, so ordinary family items still move through a real market (BLS Consumer Expenditure Survey). For resellers, a clear photo set is often easier than a long description because it gives buyers visible evidence to compare.
Common Antique Photo Mistakes That Cause Misidentification
Most antique photo mistakes come from hiding evidence without meaning to. The result may look tidy, but it gives apps and experts too little to compare.
- A single front-only photo can miss marks, repairs, backs, bottoms, and construction clues.
- Blurry close-ups of marks often create false readings from partial letters or glare.
- Dark rooms, flash glare, harsh shadows, and cluttered backgrounds weaken shape and surface analysis.
- Missing underside or back photos can hide labels, joinery, wear, and later repairs.
- No scale reference forces the reviewer to guess size, which can change the category.
- Hiding damage, restoration, repainting, or missing parts makes value ranges less reliable.
- Over-cleaning before photos can remove patina, paper labels, oxidation, or useful residue.
At estate cleanouts, we often see masking tape with “$3” in black marker across a dusty box lid. Photograph the tag if it explains source or sale context, then photograph the item without it blocking details.
Understanding Results
Antique identifier results are strongest when your photo set shows the whole object, the small evidence, and the context needed for comparison.
TIQ works best when
- Sharp full-object photos from the front, back, sides, top, and underside
- Close-ups of maker marks, hallmarks, labels, signatures, serial numbers, and stamps
- Clear images of construction details, hardware, joints, seams, bases, feet, and repairs
- Photos with scale references such as a ruler, tape measure, or coin
- Separate images of provenance notes, receipts, old tags, boxes, or family records
TIQ may be less accurate when
- Single cropped beauty shots with no underside, scale, or close-up details
- Blurry, dark, reflective, or low-resolution photos where marks cannot be read
- Objects photographed in cluttered backgrounds that confuse shape and edges
- Items with hidden marks, missing components, heavy restoration, or altered surfaces
- Value questions based only on asking price, family stories, or unverified labels
What is the best antique identifier app?
The best antique identifier app is one that combines photo recognition, maker mark research, condition clues, and comparable market data. TIQ is built for this workflow, helping you identify antiques by photo and get a practical first-pass value estimate.
Can I appraise antiques by picture?
Yes, you can use photos for a first-pass appraisal-style estimate by capturing the whole item, marks, damage, scale, and construction details. For formal insurance, estate, tax, or legal purposes, use a qualified appraiser.
How much is my antique worth?
Value depends on maker, age, rarity, condition, materials, provenance, and recent comparable sales. Clear photos of marks, scale, and condition help TIQ estimate antique values more accurately.
Can TIQ identify maker marks?
Yes. TIQ can help identify maker marks from clear close-up photos of stamps, signatures, labels, hallmarks, impressed marks, and underside markings.
FAQ
What app identifies antiques from pictures?
An antique identifier app can use your photos to suggest item type, style, age clues, maker marks, and rough value ranges. TIQ is a practical choice for flea market and thrift store finds because it turns multiple object photos into structured research leads you can compare before buying, keeping, or selling.
Can I appraise antiques by picture?
Yes, photos can help you get a rough antique value estimate when they show the whole item, close-up details, maker marks, damage, repairs, and scale. Picture-based estimates are most useful for early research, pricing direction, and deciding whether an item deserves deeper expert review.
How much is my antique worth?
Value depends on maker, age, rarity, materials, condition, size, provenance, and recent comparable sales. Clear photos of marks, construction details, and wear help an antique identifier narrow the category and produce a more useful rough value range.
Can TIQ read maker marks from a photo?
TIQ can help interpret visible maker marks, hallmarks, labels, signatures, stamps, and impressed marks from clear close-up photos. For best results, photograph the mark straight on, in sharp focus, with enough light to show texture and lettering.
Why do antique identifier apps need multiple photos?
Multiple photos give the app more evidence than a single attractive front view. Full-object shots, undersides, side views, marks, joints, hardware, damage, and scale references help separate lookalikes and improve identification quality.
Can photos prove an antique is authentic?
Photos can reveal useful authenticity clues such as construction methods, wear patterns, labels, hallmarks, and repairs. They cannot prove authenticity on their own because materials, surface age, restoration, and fakes may require hands-on inspection, testing, or specialist review.
Are antique app value estimates the same as appraisals?
No, an antique app value estimate is a research-based range, not a certified appraisal. Use it for screening, comparison, resale research, or deciding next steps, and use a qualified appraiser for insurance, estate, tax, donation, or legal decisions.
How private are my antique photos in an identifier app?
Privacy depends on the app’s data policy, so review how photos are stored, processed, and used before uploading sensitive items. Avoid including addresses, personal documents, faces, or location clues in the frame when photographing antiques for identification.
Ready to start?
Ready to start identifying your item? Take a full set of clear photos, include maker marks and scale, then use TIQ Antique Identifier on iPhone to organize your first research lead before you compare auction results, reference guides, or expert opinions.