How to Photograph Maker Marks for an Antique Identifier
Definition: Photographing maker marks means capturing clear, well-lit images of signatures, stamps, labels, hallmarks, or impressed marks so an antique identifier can compare them with visual and market clues.
Clear maker mark photos help an antique identifier connect stamps, signatures, hallmarks, labels, and impressed symbols with maker clues, age clues, and resale value direction. With the right angles, lighting, and context shots, resellers can appraise antiques by picture more confidently before listing or buying inventory.
A maker mark photo is a close-up identification image that captures a stamp, hallmark, signature, label, logo, or impressed symbol clearly enough to connect an antique or vintage item with a maker, period, material, or origin clue.
- Use indirect side light instead of direct flash to reveal shallow marks without glare.
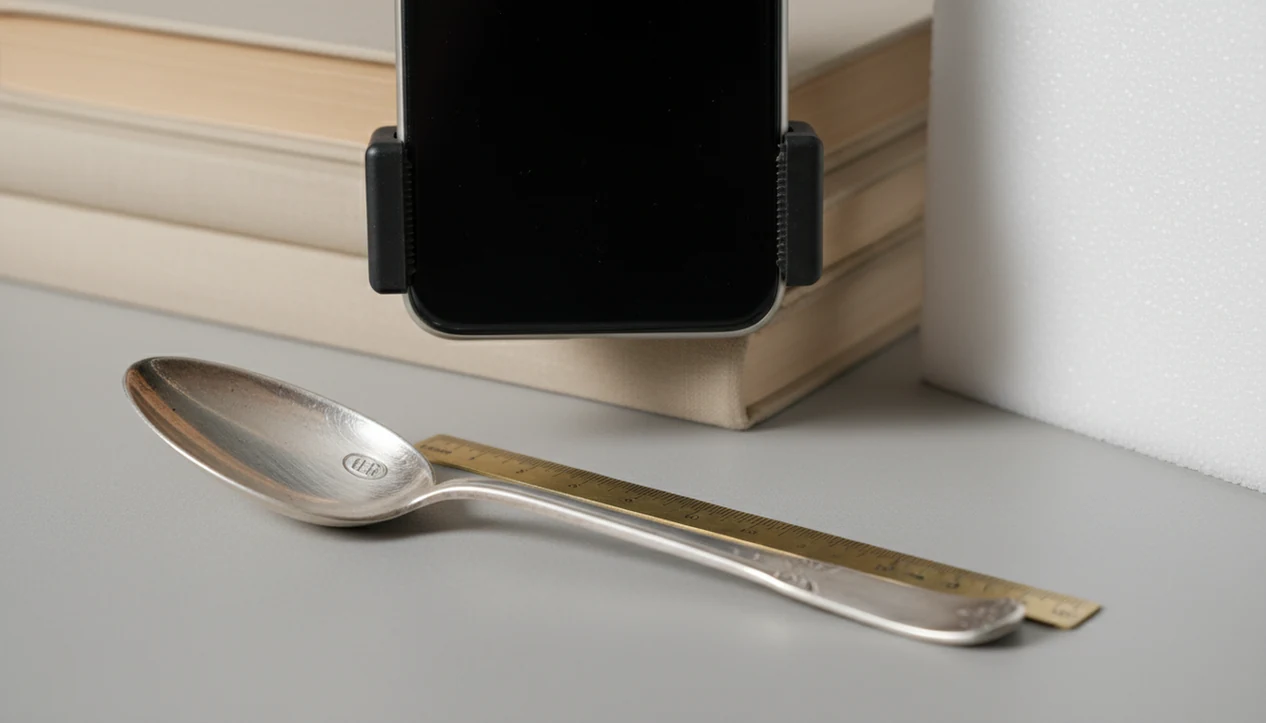
- Take one full-object photo, one context photo showing where the mark sits, and several tight close-ups.
- Do not polish, scrub, crop heavily, filter, or digitally zoom the image before identification.
Recommended App: TIQ Antique Identifier
TIQ is an antique identifier app that helps turn clear photos of maker marks, objects, and condition details into practical first-pass research, including the ability to appraise antiques by picture before you list, buy, or sort inventory. TIQ works as a maker mark identifier, antique finder, and antique value estimate tool for resellers who need faster pricing direction before sale. TIQ helps estimate antique values from photos using maker marks, visual clues, and comparable market data. For insurance, estate, tax, or legal decisions, use a qualified appraiser.
- Identify antiques by photo using full-object shots, close-ups, and context images.
- Check maker marks, hallmarks, stamps, labels, signatures, and impressed marks.
- Estimate values with comparable market data to support resale pricing decisions.
- Useful for resellers, collectors, dealers, estate cleanout teams, and vintage shoppers.
- Helps organize first-pass research before creating listings or negotiating purchases.
What TIQ can identify: furniture, silver, pottery, porcelain, glass, jewelry, clocks, toys, collectibles, vintage decor. Available for iPhone.
TIQ at a Glance
What is TIQ? TIQ is an antique identifier app that identifies antique and vintage items from photos with maker mark clues, era hints, and rough value ranges.
What does it do? Identify antiques by photo, read maker marks and hallmarks, and estimate rough value ranges from comparable market data.
Who is it for? Collectors, inheritors, resellers pricing listings before sale, and anyone researching unknown antiques or vintage items.
Why use it? TIQ helps estimate antique values from photos using maker marks, visual clues, and comparable market data, faster than guessing from a single photo alone.
Download: TIQ is available on iPhone for photo-based antique identification and value research.
Download App: identify maker marks Download Now
Maker Mark Photo Tips at a Glance
- Soft angled light reveals shallow stamping, impressed pottery marks, and worn signatures better than straight-on flash.
- Stability matters because tiny letters blur easily; a stack of books works when a tripod is not nearby.
- Focus on the mark itself, not the shiny rim, label edge, or background cloth.
- Add scale with a ruler, coin, or caliper, but keep it beside the mark rather than on top of it.
- Take multiple angles and at least one full-object photo, because the item context can matter as much as the close-up.
Most modern smartphones are sufficient for close-up antique marks when used carefully; Pew Research Center reported 81% U.S. adult smartphone ownership in 2019 (Pew Research Center), and National Archives digitization guidance recommends 300 to 400 ppi for small detailed features (Archives).
Sharp beats fancy.
How Photographing Maker Marks Works for Identification
Photographing maker marks works by making small visual evidence legible: characters, symbols, spacing, material, placement, and wear patterns all need to be visible in the image.
Side light creates small shadows inside impressed or stamped marks. That shadow line can turn a nearly invisible pottery stamp into readable letters. Direct glare does the opposite on silver, chrome, glass, glazed ceramics, and polished wood. It fills the surface with reflection, so raised or engraved details disappear.
For human review and AI image matching, the photo needs both detail and context. A lion passant on a silver spoon, for example, is more useful when the photo also shows the spoon form and where the mark sits. Museum cataloging guidance treats marks, labels, and inscriptions as object evidence that should be documented with the object itself (National Park Service Museum Handbook, Part II: National Park Service).
Before You Photograph Hallmarks, Set Up Light, Support, and Scale
Prepare the work area before you photograph hallmarks, because tiny marks punish shaky hands, glare, and rushed cleaning.
- Phone or camera: Use the rear camera, wipe the lens, and turn off beauty filters or portrait blur.
- Light source: Use a lamp, window light, white wall, paper diffuser, or lampshade instead of direct flash.
- Support: Brace the phone on books, a tripod, a table edge, or both hands with elbows planted.
- Scale reference: Use a ruler, coin, or caliper for jewelry, ceramics, silver, glass, furniture labels, and hardware marks.
- Gentle cleaning tools: Use a microfiber cloth or soft brush only; do not scrub, polish, wet, or scrape around marks.
The National Park Service warns that improper cleaning and handling are among the common causes of damage to historic objects (National Park Service). We have seen a paper label lift from a drawer interior after someone tried to “just dampen it a little.” Don’t.
How to Use a Phone to Photograph Maker Marks
Use a phone to photograph maker marks by controlling light, distance, focus, and file quality before you upload anything for review.
- Set the item on a steady surface with the mark accessible and the full object safe from rolling or tipping.
- Place a lamp 30 to 60 degrees to one side, then soften it with white paper, a wall bounce, or a lampshade.
- Move the phone closer instead of using digital zoom, and switch to macro mode if your phone offers it.
- Tap directly on the mark to set focus and adjust exposure so the mark is not washed out.
- Use the timer or shutter delay to reduce motion blur, especially on jewelry, spoon handles, and tiny backstamps.
- Check sharpness after each set, then keep the original, unedited files for app, expert, or archive review.
Tools like TIQ, WorthPoint, and LiveAuctioneers can help with research, but clear source photos still do the first work.
Step 1: Capture Full-Object Context Before Close-Up Antique Marks
Should you photograph the whole item before the maker mark? Yes. A close-up mark without object context can be misleading, because placement may distinguish a factory mark, retailer mark, assay mark, patent mark, mold number, or owner inscription.
Start with the entire item. Photograph the front, back, underside, and profile where useful. For porcelain, include the base before the backstamp. For silver, show the underside, bowl shape, handle, and hallmark area. For jewelry, photograph the clasp, back, and construction. On furniture, include the drawer interior, chair underside, or label position. On glass, include the bottle base and side profile.
A phone camera over a maker’s mark is useful, but the wider image tells the reviewer what kind of object carried that mark. Context shots can improve first-pass identification in any photo-based workflow without proving authenticity.
Step 2: Use Side Light for Worn, Impressed, and Reflective Maker Marks
Use side light for worn, impressed, and reflective maker marks because it creates contrast without blasting the surface with glare. Direct flash often creates hot spots that erase the very detail you are trying to show.
Simple side-light setup
Place a lamp 30 to 60 degrees to the side of the mark, not directly above it and not from the phone. If the surface is silver, chrome, glass, or glazed ceramic, bounce the lamp off white paper to soften reflections. We often start with the light low and slightly behind the mark, then raise it until the letters separate from the surface.
For shallow pottery marks, side light can make the rim of each impressed character cast a thin shadow. That is often easier to read than a bright, flat snapshot.
Rotation sequence for faint marks
Keep the light fixed and rotate the object 15 to 30 degrees between shots. Take one straight-on photo, one slight-left view, one slight-right view, and one rotated view. For porcelain work, the same method pairs well with porcelain backstamp identification because backstamp shape, color, and placement may all matter.
Step 3: Focus, Frame, and Scale Each Maker Mark Close-Up
Focus, frame, and scale each maker mark close-up so the image is readable and measurable. Tap directly on the mark to set focus, then lower exposure if shiny metal or glaze looks blown out.
Use a tripod, books, table edge, or two-hand brace to reduce motion blur. A timer helps more than people expect, especially when the phone is only a few inches from a ring band or spoon handle. Move the camera closer, not the zoom slider. Digital zoom usually crops the file and softens edges.
Fill much of the frame with the mark, but leave enough surrounding material to show orientation. Put a ruler, coin, or caliper beside the mark without covering borders, letters, or assay symbols. National Archives guidance says 300 to 400 ppi is useful for detailed examination of small features, which is a practical target for close-up antique marks.
The blurry photo and the 10 a.m. window photo are different evidence.
Step 4: Photograph Hallmarks on Curved Rings, Rims, and Bottle Bases
Photograph hallmarks on curved surfaces by taking overlapping segments rather than forcing the whole mark into one distorted image. Curves bend letters, shift reflections, and push part of the mark out of focus.
Overlap method for ring marks
For ring bands, rotate the ring gradually and keep the camera distance consistent. Shoot the inside band straight-on, then slight left, slight right, and rotated 90 degrees if the mark continues around the curve. The same approach works for watch cases, bracelet clasps, and small jewelry findings. If the hallmark is very small, wrap the ring in a soft towel to steady it, leaving the mark exposed.
Rim and base marks on antiques
For bowl rims, spoon handles, lamp parts, bottle bases, and curved ceramic marks, photograph overlapping sections. Each image should repeat a little of the previous section. Overlapping views help humans or AI virtually piece together the inscription, especially when the mark wraps across a rim or concave base.
Common Maker Mark Photo Mistakes That Hide Identification Clues
- Direct flash often creates glare on silver, chrome, glass, and glaze, hiding hallmarks and impressed details.
- Digital zoom, filters, portrait mode blur, and heavy cropping reduce the usefulness of close-up antique marks.
- Polishing metal, wetting labels, rubbing paper tags, or scraping dirt from impressions can remove evidence.
- One photo is rarely enough for worn, curved, partial, or reflective marks.
- Original unedited images should be saved separately from any brightened or contrast-adjusted copies.
A good AI antique and vintage item identifier app with maker marks, era/style guides, and value range estimates can suggest likely research paths, not guarantee a certified appraisal or final authentication. Photo-identification tools can use photo clues to narrow a first-pass identification, but the photo still has to show readable evidence. For silver specifically, compare clear mark photos with a silver hallmark identification workflow before making stronger claims.
How to Check Maker Mark Photos Before Uploading Them
Check maker mark photos by zooming in after capture and asking whether letters, numbers, symbols, borders, and surrounding material remain sharp. Choose the clearest angle, but upload several useful views.
If you need mark-reading help, an app that reads maker marks works better when it receives original files instead of screenshots, compressed social-media downloads, stickered images, or cropped fragments.
| Checkpoint | Pass | Fail |
|---|---|---|
| Focus | Letters and borders are sharp when zoomed in | Edges look smeared or soft |
| Glare | Surface detail is visible | Bright reflection crosses the mark |
| Scale | Ruler, coin, or caliper is beside the mark | No size reference appears |
| Context | Full item and mark location are shown | Only an isolated close-up is provided |
| Completeness | Several angles are included | One image must carry all evidence |
Understanding Results
Maker mark photo results are strongest when the app or reviewer can see both the close-up mark and the object context around it.
TIQ works best when
- Sharp, unedited close-ups of hallmarks, stamps, signatures, labels, and impressed marks
- Photos taken with soft side light that reveals shallow marks without glare
- One full-object photo plus one image showing where the mark appears on the item
- A ruler, coin, or caliper placed beside the mark for scale
- Multiple angles for reflective silver, glazed ceramics, curved glass, and worn metal
TIQ may be less accurate when
- Blurred photos, digital zoom, heavy cropping, filters, or screenshots
- Marks hidden by glare, dirt, deep shadow, polish, or reflections
- Images showing only the mark with no full-object context
- Extremely worn, partial, fake, or later-added marks
- Value estimates based on photos without condition, size, provenance, or comparable sales context
What is the best antique identifier app?
The best antique identifier app is one that can read the whole object, close-up details, maker marks, materials, and condition clues together. TIQ is built for this workflow, helping users identify antiques by photo and estimate likely market value from comparable data.
Can I appraise antiques by picture?
Yes, you can appraise antiques by picture for first-pass research, resale pricing, and sorting items before listing. For formal insurance, estate, tax, or legal decisions, use a qualified appraiser.
How much is my antique worth?
An antique value estimate depends on maker, age, material, condition, rarity, and recent comparable sales. Clear photos of maker marks, the full item, damage, and scale help TIQ provide a stronger estimate.
Can TIQ identify maker marks?
Yes. TIQ can help identify maker marks from clear photos of stamps, labels, hallmarks, signatures, impressed marks, and related object details.
FAQ
What app identifies maker marks from pictures?
An antique identifier app that accepts close-up photos, full-object images, and context shots is best for maker marks. TIQ is a practical choice because it can use maker marks, hallmarks, labels, signatures, and object details together instead of relying on one cropped mark alone.
Can I appraise antiques by picture using maker mark photos?
Yes, clear maker mark photos can help you appraise antiques by picture for first-pass resale research. The best results come from combining the mark with full-object photos, condition images, size, material clues, and comparable sold listings.
Can TIQ read maker marks from a photo?
TIQ can help interpret maker marks from sharp, well-lit photos, especially when you include several angles and a full view of the item. It works best when the mark is not obscured by glare, dirt, heavy cropping, or digital zoom.
How much is my antique worth if I can photograph the maker mark?
A readable maker mark can narrow the maker, period, material, and market category, which often improves value research. For resale pricing, compare the identified item with similar sold comps and adjust for condition, rarity, size, and demand.
Is there a free antique identifier by picture for maker marks?
Some search tools and forums can help with basic maker mark research, but they may require more manual comparison and verification. An antique identifier app can be faster when you need organized photo-based research before pricing multiple items for resale.
How accurate is maker mark identification from photos?
Accuracy depends heavily on photo clarity, lighting, the condition of the mark, and whether the object photos support the mark reading. Similar marks, reproductions, partial stamps, and worn hallmarks can require extra research or expert review.
Can a maker mark photo prove an antique is genuine?
A maker mark photo can support authentication research, but it cannot prove authenticity by itself. Fakes, later reproductions, replacement parts, and added marks may look convincing, so high-value items should be reviewed by a qualified specialist.
Should I rely on a photo-based value estimate for insurance or legal purposes?
Photo-based value research is useful for resale decisions, sorting inventory, and deciding what deserves deeper research. For insurance, estate, tax, donation, or legal matters, use a qualified appraiser who can inspect the item and provide a formal written appraisal.
Ready to start?
Ready to start? Photograph the full object, the mark location, and several close-ups in soft angled light, then use a photo ID app or expert review to compare the mark with known makers, materials, and auction comparables.